Password-protecting your USB drive is essential for safeguarding sensitive data. Whether it’s personal information, work-related files, or compliance with data security regulations, password protection ensures that only authorized individuals can access your files. You can achieve this through various methods: manually setting passwords for individual files, using BitLocker on Windows Pro, Enterprise, or Education editions, or employing third-party encryption software like VeraCrypt or Rohos Disk Encryption for Windows Home users. Regularly updating passwords, avoiding public computers, and maintaining data backups are key security practices.
Understanding the Importance
Confidential Data Protection
USB drives often house a treasure trove of confidential data, from sensitive documents and personal information to work-related files. Password protection is a robust barrier, ensuring only authorized individuals can access this data.
Data Theft Prevention
Imagine your USB drive falling into the wrong hands. Without proper protection, unauthorized access and potential data theft become real threats. Password protection serves as a guardian, keeping your data safe and secure.
Compliance with Regulations
For businesses and organizations, password-protecting USB drives may be more than a choice; it can be a legal requirement. Implementing password protection is often necessary to comply with data security regulations and standards.
Method 1: Manual Password Protection

Step 1: Open the File
Insert your USB drive into your computer and open the folder containing the file you want to protect.
Step 2: Access File Options
Click on the “Tools” tab located in the primary menu of the document. At the bottom of the list, you’ll find the “Options” category. Select it.
Step 3: Security Settings
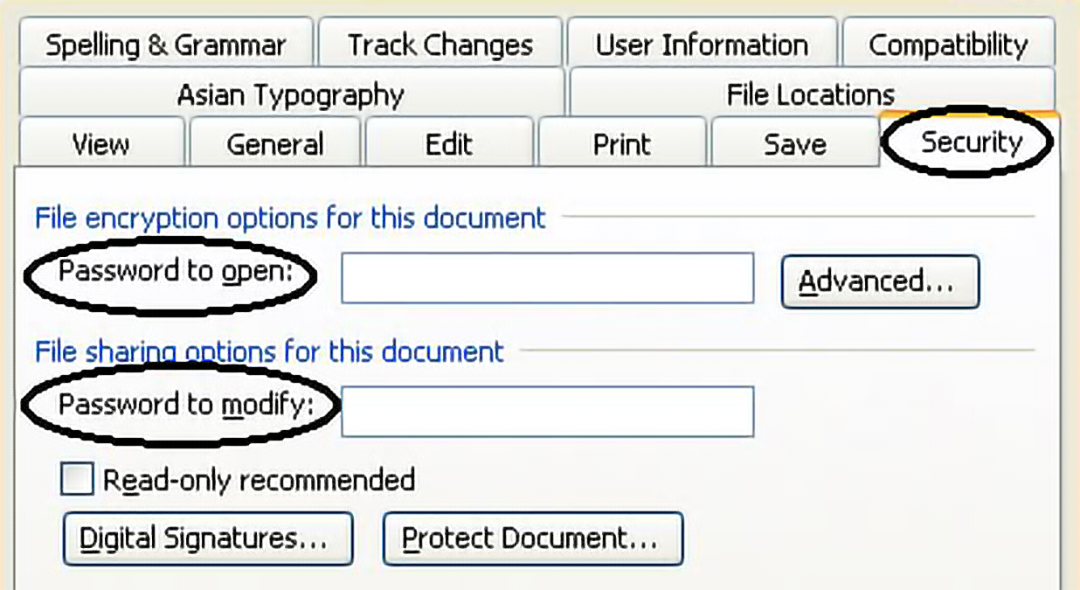
In the “Options” window, navigate to the “Security” tab, typically found in the third row at the end of the list. Click on it to access security settings.
Step 4: Password to Open
Locate the “Password to Open” option. Here, you’ll assign a password to open the file. Remember this password, as it’s essential for accessing the file. This password grants access but doesn’t allow changes to the file.
Step 5: Password to Modify
If you want to make changes to the file while keeping it password-protected, select the “Password to Modify” option. Enter a password here as well. This password allows you to make changes to the file. Click “OK” to save your changes.
Step 6: File is Now Protected
Your file is now password-protected. If you attempt to open it by double clicking the file icon on your USB drive, it will prompt you to enter the password. Similarly, when you try to modify it, you must enter the password again. This ensures that your file is fully secure from unauthorized access.
Repeat for Additional Files
You can apply the same method to password-protect other files and folders on your USB drive. This way, you can safeguard all your sensitive data efficiently.
Whether you use a unique password for each file or implement the same password for all your records is entirely up to you. Just ensure you remember these passwords to access your data when needed.
Method 2: Using BitLocker (Windows Pro, Enterprise, or Education Editions only)

BitLocker is a built-in encryption tool in Windows that can help you protect your USB drive with a password. Note that this method requires Windows Pro, Enterprise, or Education editions.
What You’ll Need
Before you begin, make sure you have the following:
- A USB drive you want to protect.
- A Windows computer with BitLocker encryption (BitLocker is available in Windows Pro and Enterprise editions).
- Administrator access to your computer.
Step 1: Insert Your USB Drive
Start by plugging your USB drive into your computer’s USB port. Ensure it’s properly connected and recognized by your system.
Step 2: Access BitLocker
- Click on the Windows Start menu.
- Type “BitLocker” into the search bar and select “Manage BitLocker” from the search results.
Step 3: Enable BitLocker
Locate your USB drive in the BitLocker window. Click “Turn on BitLocker.”
Step 4: Choose a Password
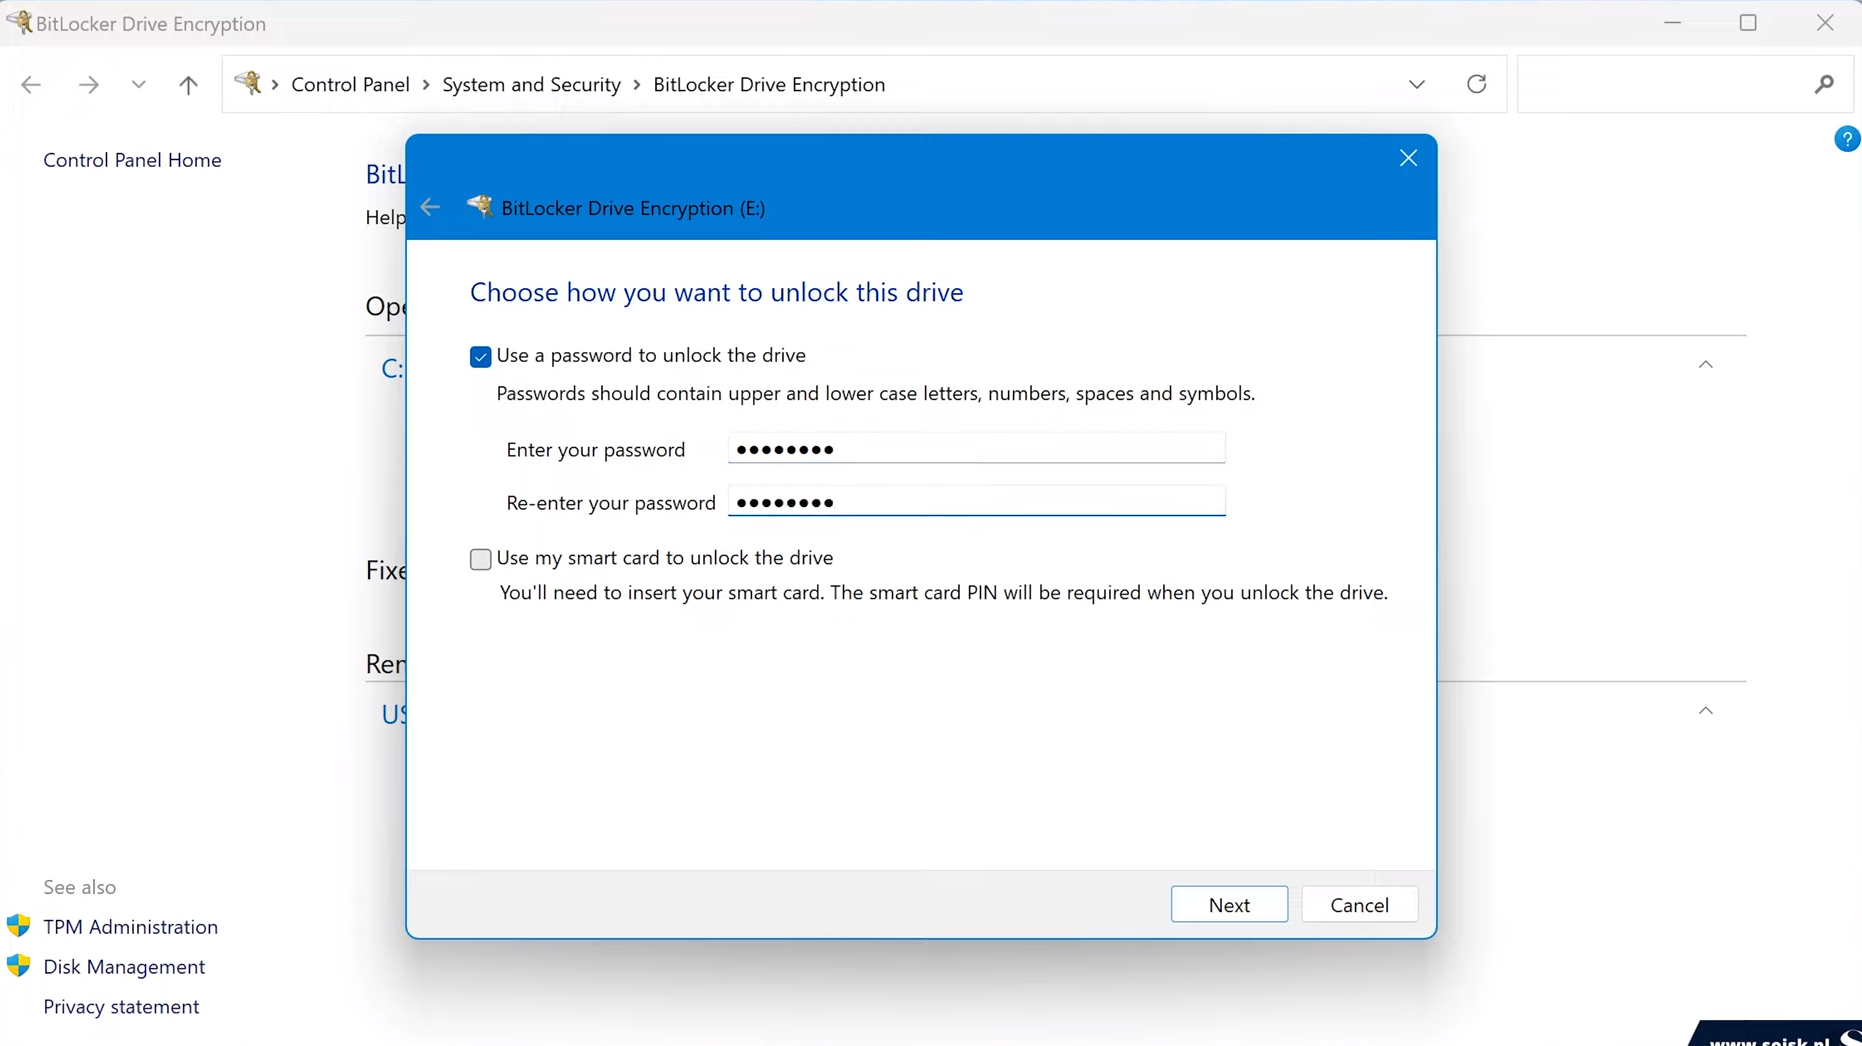
- Select “Use a password to unlock the drive.”
- Enter a strong and unique password. Make sure to include a combination of letters, numbers, and special characters for added security.
Step 5: Backup Your Recovery Key
Choose how you want to back up your recovery key. You can save it to your Microsoft account, a file, or print a hard copy. Ensure you keep this key safe; it’s your lifeline to unlocking the drive if you forget your password.
Step 6: Encrypt the Drive
Click “Next” to start the encryption process. This may take some time, depending on the size of your USB drive.
Step 7: Completing the Process
Once the encryption is complete, click “Close.” Your USB drive is now password-protected.
Testing Your Encrypted USB Drive
Eject your USB drive and plug it back in. You’ll be prompted to enter the password you created earlier. This step ensures that your drive is secure and functioning as intended.
Method 3: Using Third-Party Software

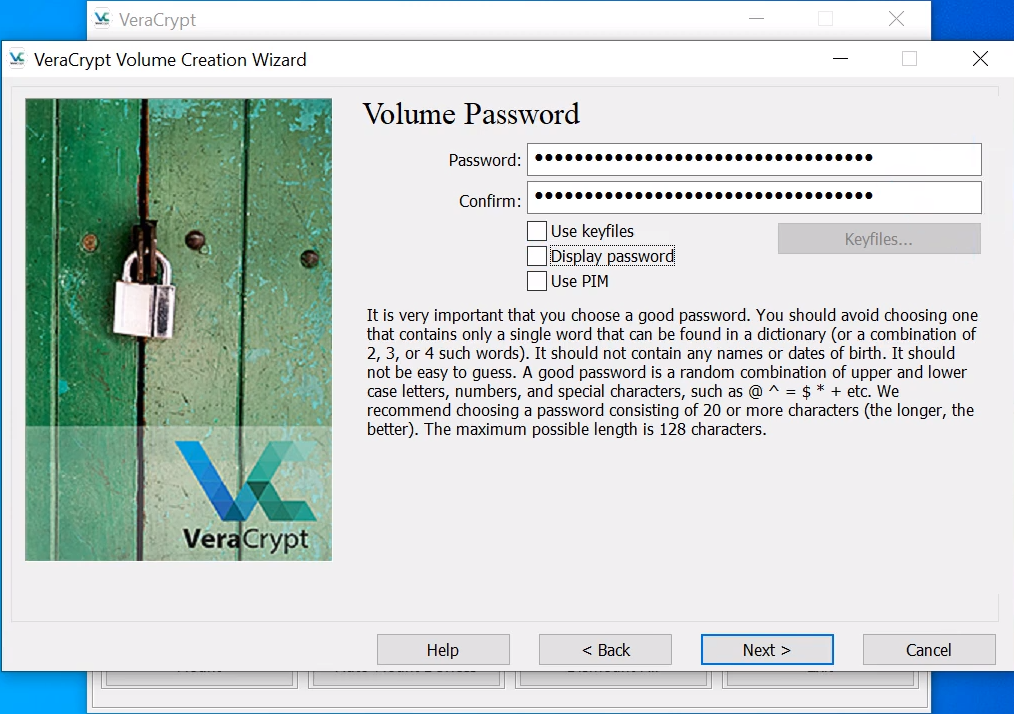
If you use Windows Home Edition or prefer a third-party solution, use VeraCrypt or Rohos Disk Encryption software.
- Download and install the third-party encryption software of your choice.
- Launch the software and select the option to create a new encrypted volume.
- Follow the software’s instructions to create an encrypted container on your USB drive. You’ll need to set a password during this process.
- Once the encrypted container is created, you can move your sensitive files.
- Open the encryption software and enter the password to access the protected files.
Tips for Enhanced Security
- Regularly update your password: Change your USB drive password periodically to strengthen security.
- Avoid public computers: Be cautious when using your encrypted USB drive on public computers, as they may have malware or keyloggers.
- Backup your data: Always maintain backups of your important data in case of any unexpected issues with your USB drive.
Conclusion
Securing your USB drive with password protection is fundamental in safeguarding sensitive data in today’s digital world. Whether you opt for manual password protection, BitLocker on compatible Windows editions, or third-party encryption software, the aim remains to ensure that only authorized users can access your confidential files. Regular password updates, caution when using public computers, and diligent data backups are essential for maintaining the security of your information. Remember that the strength of your password and the safekeeping of recovery keys play a crucial role in the effectiveness of this security measure.
FAQs
What if I forget my USB drive password?
If you’ve backed up your recovery key, you can use it to unlock your drive. If not, you may need to format the drive, losing the stored data.
Can I use BitLocker on all Windows versions?
BitLocker is available in Windows Pro and Enterprise editions. You may need third-party encryption software if you’re using a different version.
Is BitLocker encryption strong enough?
Yes, BitLocker uses advanced encryption algorithms to protect your data. However, always use a strong and unique password for added security.
Can I remove the password protection from my USB drive?
Yes, you can decrypt your USB drive using BitLocker settings. Keep in mind that this action will remove the password protection.
Is there any way to recover data from a password-protected USB drive without the password?
No, the purpose of password protection is to prevent unauthorized access. Without the correct password or recovery key, the data remains inaccessible.
