
In today's digital world, protecting confidential documents is a top priority. When you need to send a sensitive PPT file, simply attaching it to an email is a significant security risk. The solution is to use a powerful tool that combines encryption with seamless sharing. This comprehensive overview from Newsoftwares.net will show you how to send a password-protected PPT file securely by leveraging the robust sharing features of Folder Lock in conjunction with Dropbox. This process ensures your private information remains protected from unauthorized access, providing you with peace of mind.
Why and Importance of Password-Protecting a PPT File
Sending a PPT file with a password is not just an extra step; it's a critical security measure. Without a password, your document is exposed to potential data breaches, interception, or unauthorized viewing. This practice is especially important for:
- Legal Documents: Contracts, case files, and non-disclosure agreements.
- Financial Reports: Invoices, tax documents, and proprietary financial data.
- Personal Information: Medical records, resumes, and private correspondence.
By protecting your PPT file, you ensure that only the intended recipient can access its contents, even if the file is compromised during transfer.
Online vs. Offline Tools for Sending a Protected PPT
When it comes to securing a PPT file for sharing, you have two primary options: using an online service or a dedicated offline application.
Online Tools
These are web-based services that promise quick, easy PPT protection.
- Pros: They are convenient and require no downloading or installing of software. Many offer a basic free service.
- Cons: This convenience comes at a significant cost to your privacy. To work, these tools require you to upload your confidential document to their servers. This means your sensitive file is floating in a third-party cloud, an unencrypted link in the chain that you cannot control.
Offline Tools
Offline tools are applications you install directly on your computer.
- Pros: They are far more secure, as your document never leaves your machine. They work without an internet connection, and you have complete control over the process. A dedicated tool like Folder Lock uses military-grade AES 256-bit encryption, a global industry standard for data security.
- Cons: Many of the robust offline tools come with a cost, and they require a one-time download and installation.
When the goal is to securely share a file, trusting your most private data to a random company's cloud is a major risk. For this reason, we will focus on the offline solution provided by Folder Lock.
The Folder Lock Method: A Step-by-Step Guide to Secure Sharing
Folder Lock integrates with popular cloud services to provide a powerful and secure way to share your encrypted files. This process ensures that your PPT file is protected both on your computer and in the cloud.
Prerequisite
- You need to install the Folder Lock application. If you have not installed it yet, you can read How to Download, Install, and Get Started with Folder Lock.
- To share files using this method, both you (the sender) and the person you are sharing with (the recipient) must have a registered Folder Lock account.
- You must both have an account with the same cloud service you intend to use e.g., Dropbox.
- Dropbox must be integrated with Folder Lock. For integrating Read out How to Install and Integrtae Dropbox in Folder Lock?
Follow below mentioned steps to share your password protected PPT file.
Part 1: Saving Your PPT File in Dropbox Locker
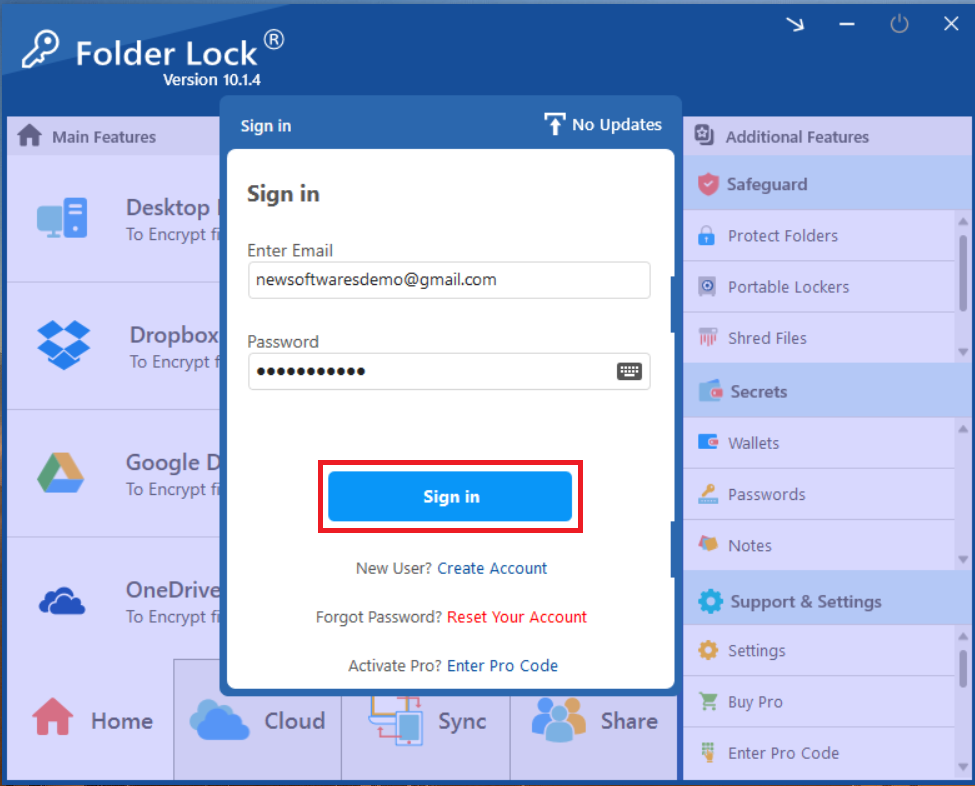
Step 1: Launch Folder Lock and Sign In
- Launch the Folder Lock application on your computer and sign in.
Step 2: Look for "Dropbox Locker"
- On the main screen, under the "Dropbox Locker" section, click the "Open" button. This is the fastest way to access your locker directly.
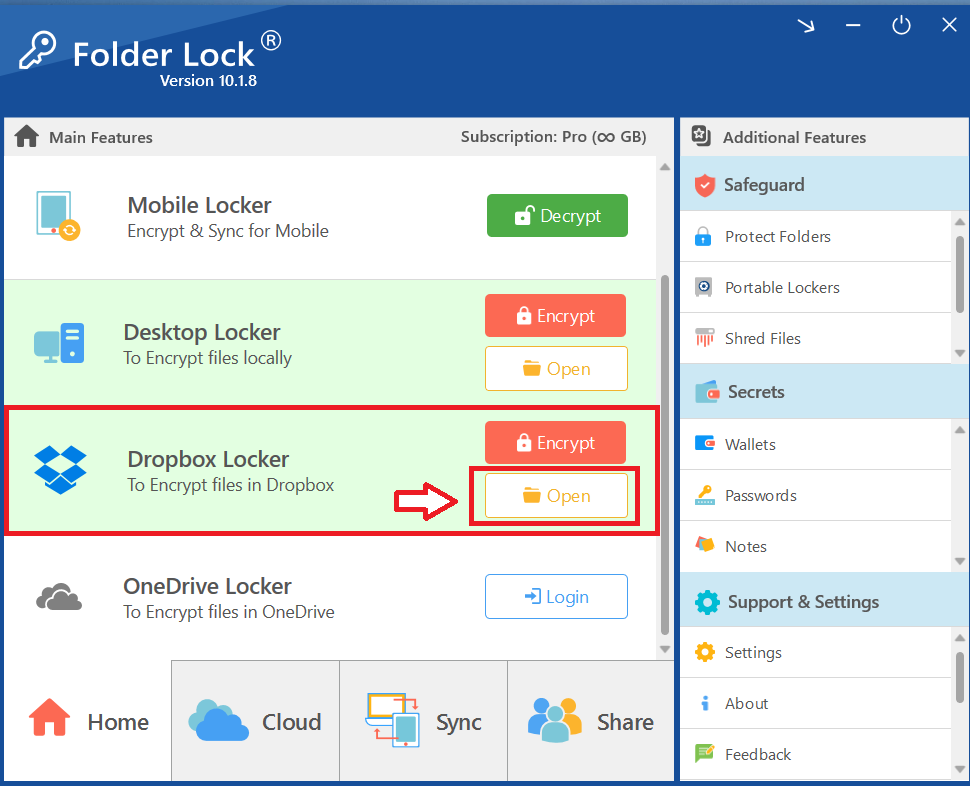
If Your Dropbox locker is encrypted, A green button "Decrypt" appears in place of Encrypt button. Click on "decrypt" button. This will give you access to button named "Open".
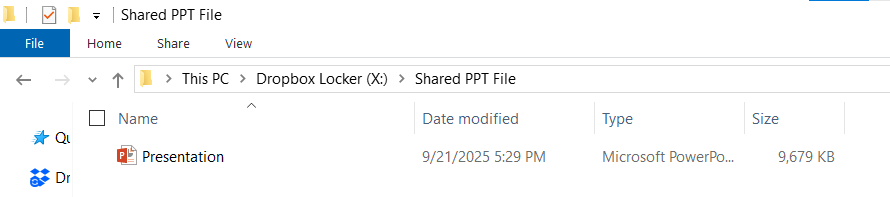
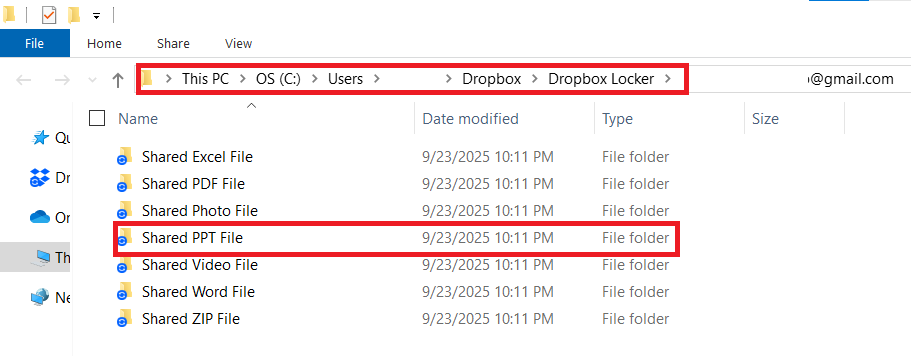
- Clicking on "Open" will Open your Dropbox locker in File Explorer as shown in below screenshot.

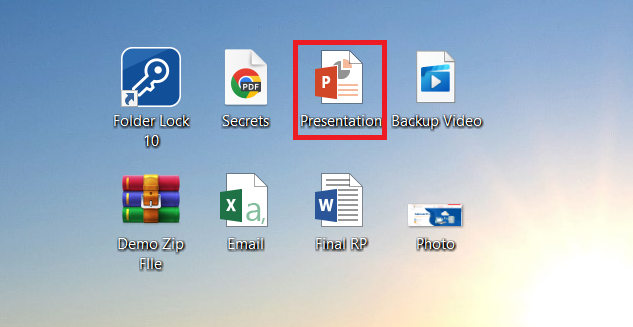
- Copy your desired PPT file from your PC / Laptop to Dropbox Locker.
- Make sure to place the PPT file in a folder. PPT File placed outside any folder cannot be shared. In my case, I have created a folder named "Shared PPT File".
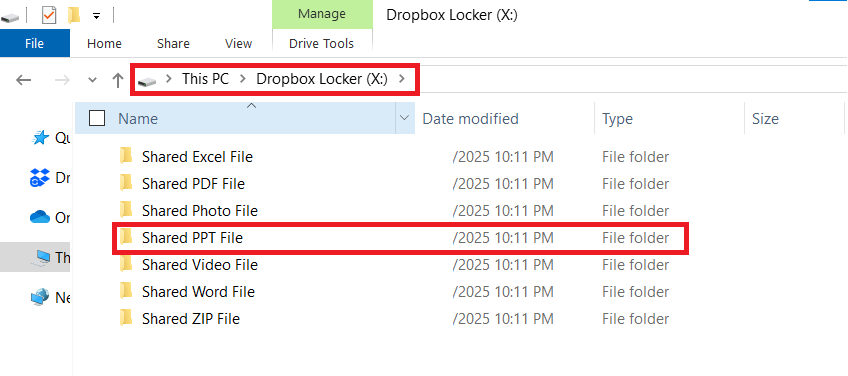
- Paste your PPT file in the folder you have just created.
Part 2:The Sender's Process - Securing and Sharing the PPT File
Step 1: Access Share Tab & Set Permissions
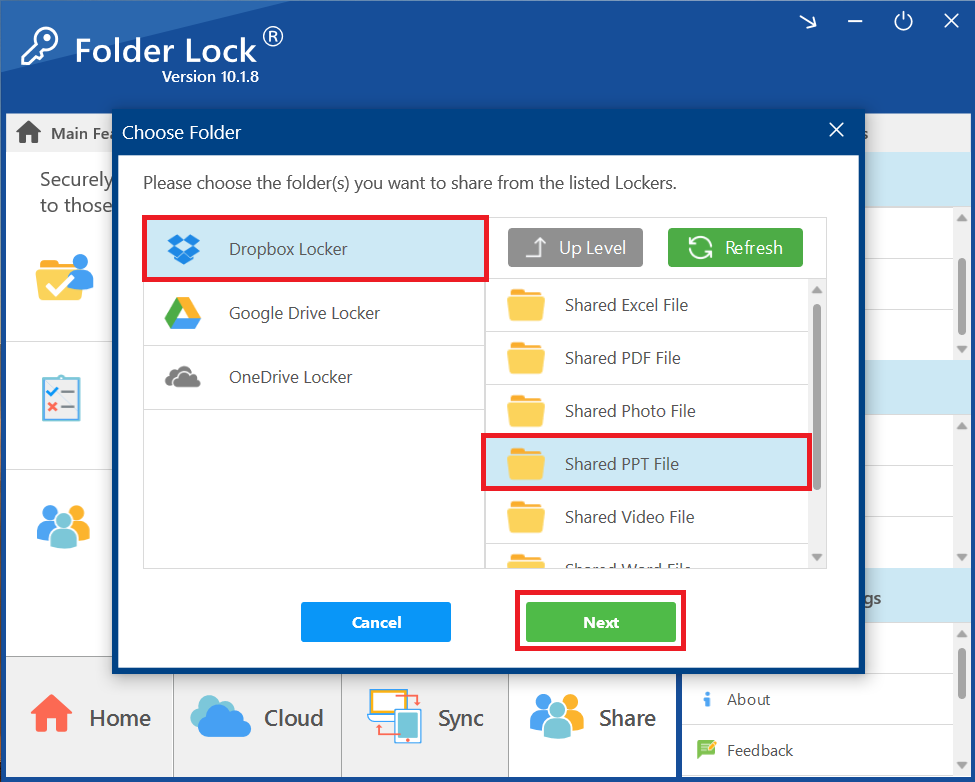
- Access the "Share" Tab. On the home screen of Foder Lock, click the "Share" tab in the bottom-right corner.
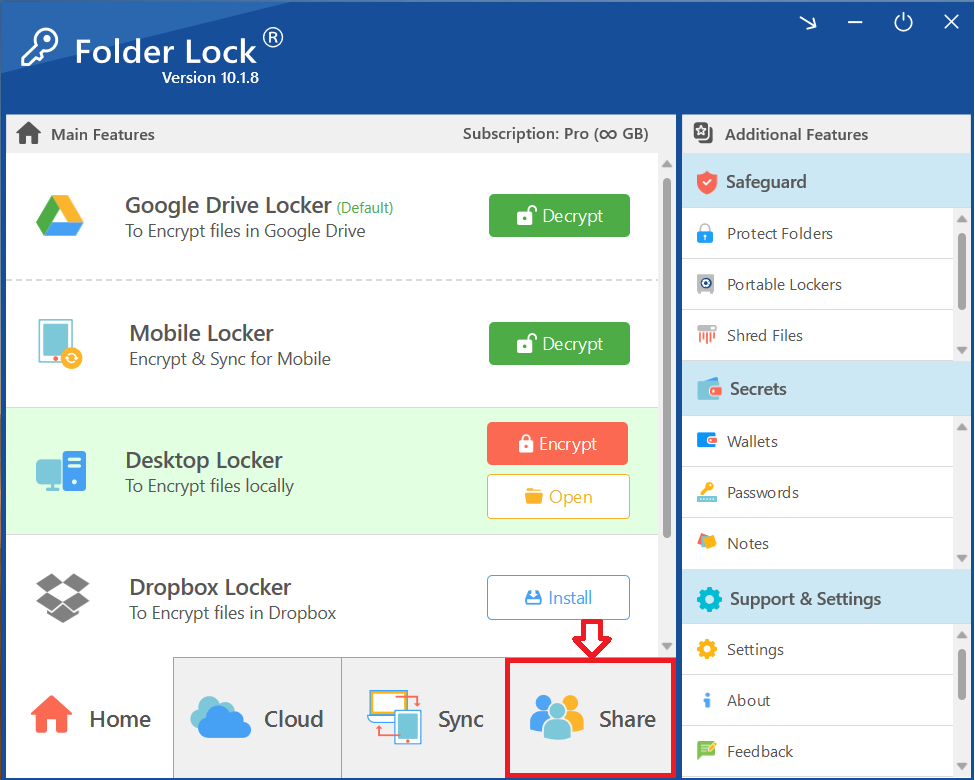
- The "Share" interface will appear. To begin, click the green "Give Permission" button under the "Set Permissions" section.
- Select "Dropbox Locker" and find the folder containing your PPT file in Dropbox locker.
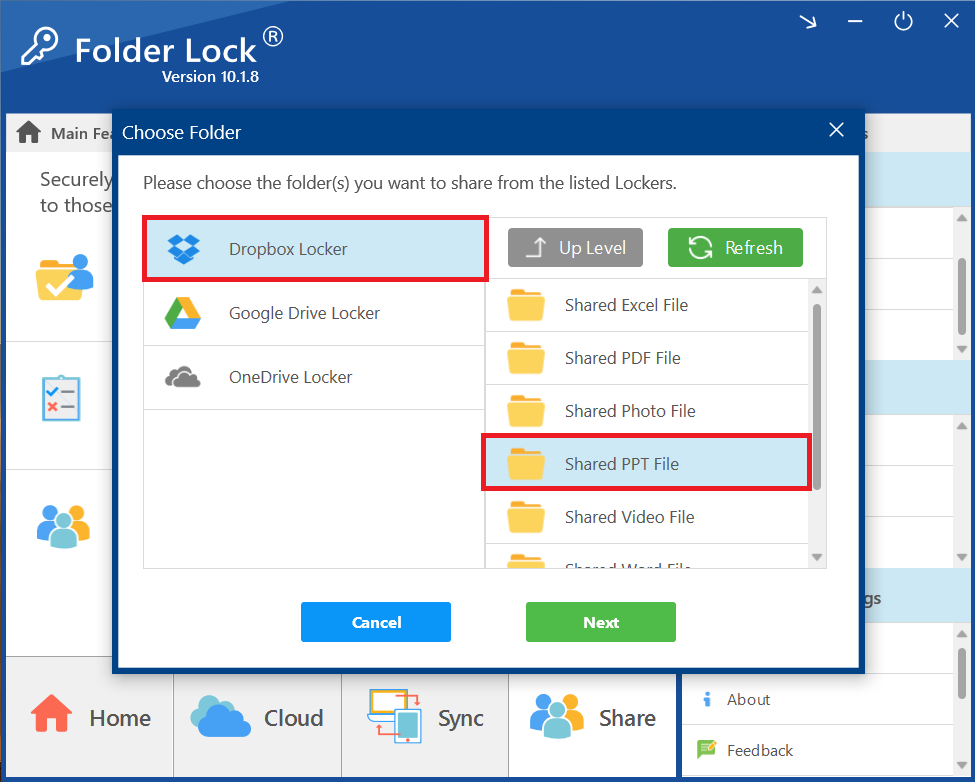
- Proceed to Share Settings. Click the "Next" button.
Step 2: Applying Permissions to Your Shared Folder
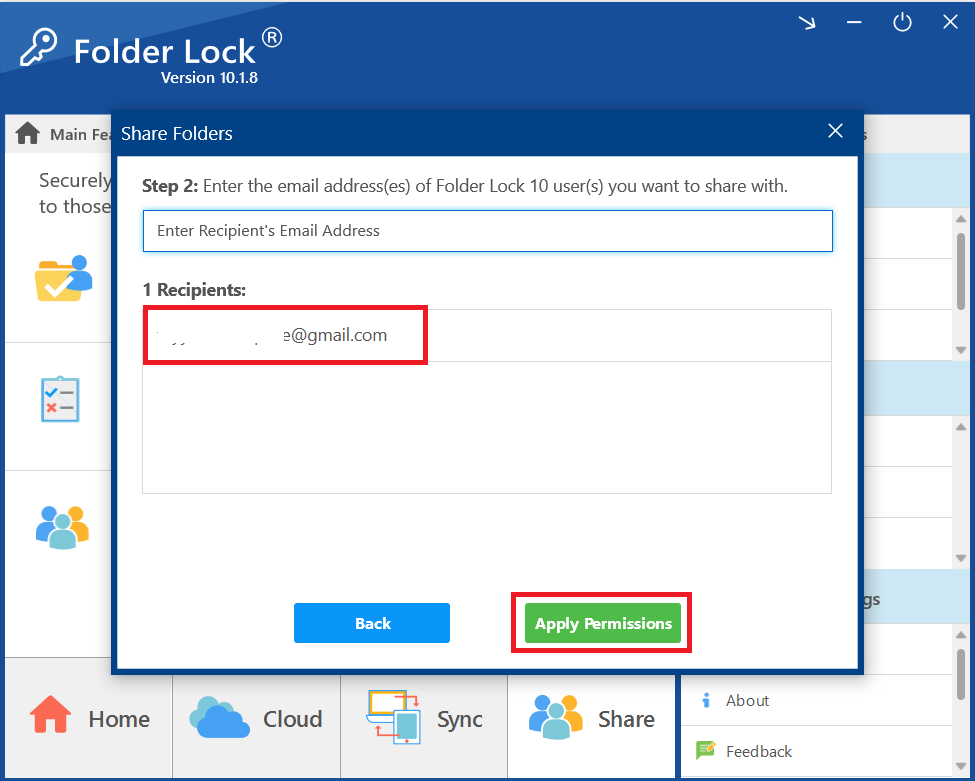
- A "Share Folders" window will appear, prompting you to enter the email address of the person you want to share with.
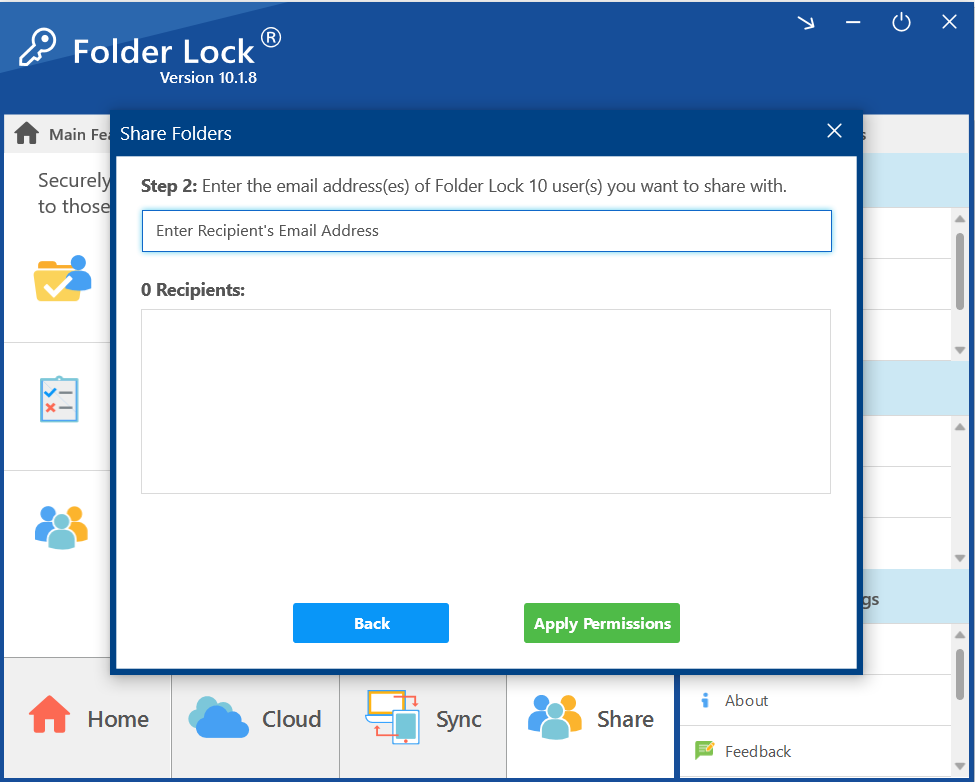
- Enter the Recipient's Email Address. Enter the recipient's email address in the provided field.

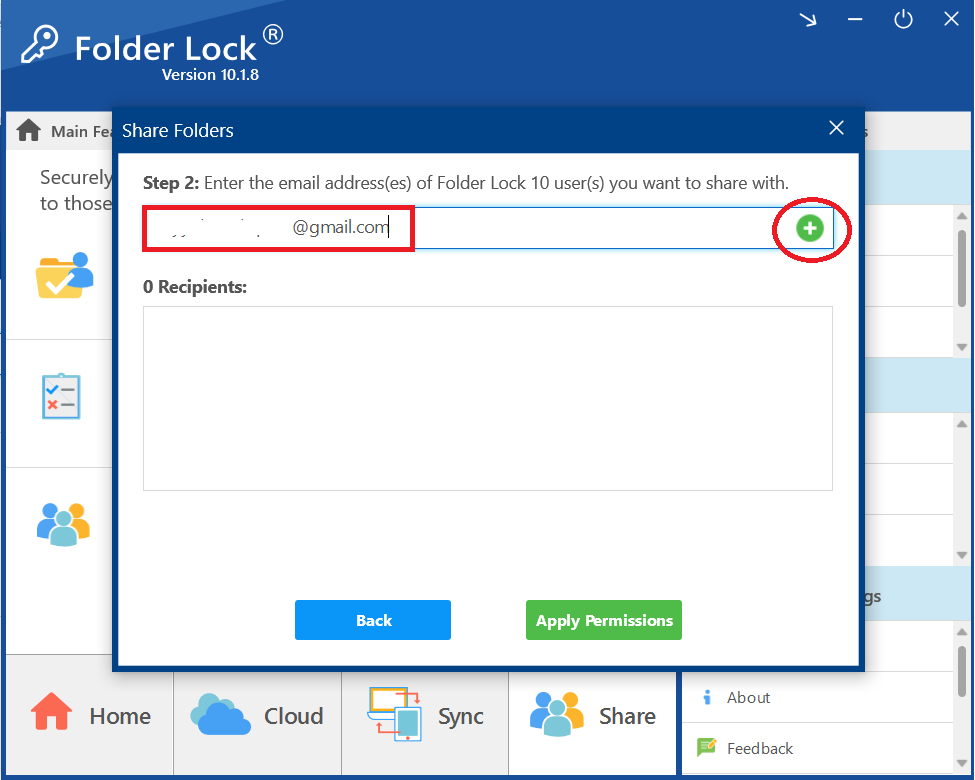
- Add the Recipient. Once the email address is entered, click the plus (+) button next to the field to add the recipient to the list. You can add multiple recipients as per your requirements.
- Confirm the Recipient is Added. The recipient's email will now appear in the list below, showing that they have been added as a recipient.
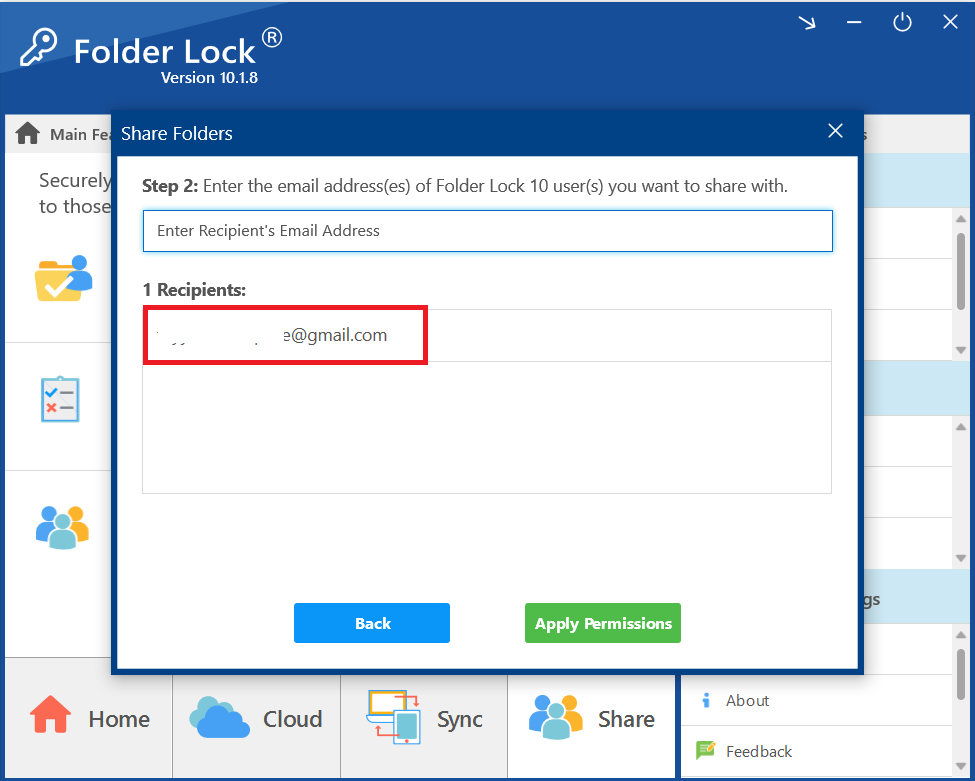
- Apply Permissions. After you have added all the desired recipients, click the green "Apply Permissions" button.
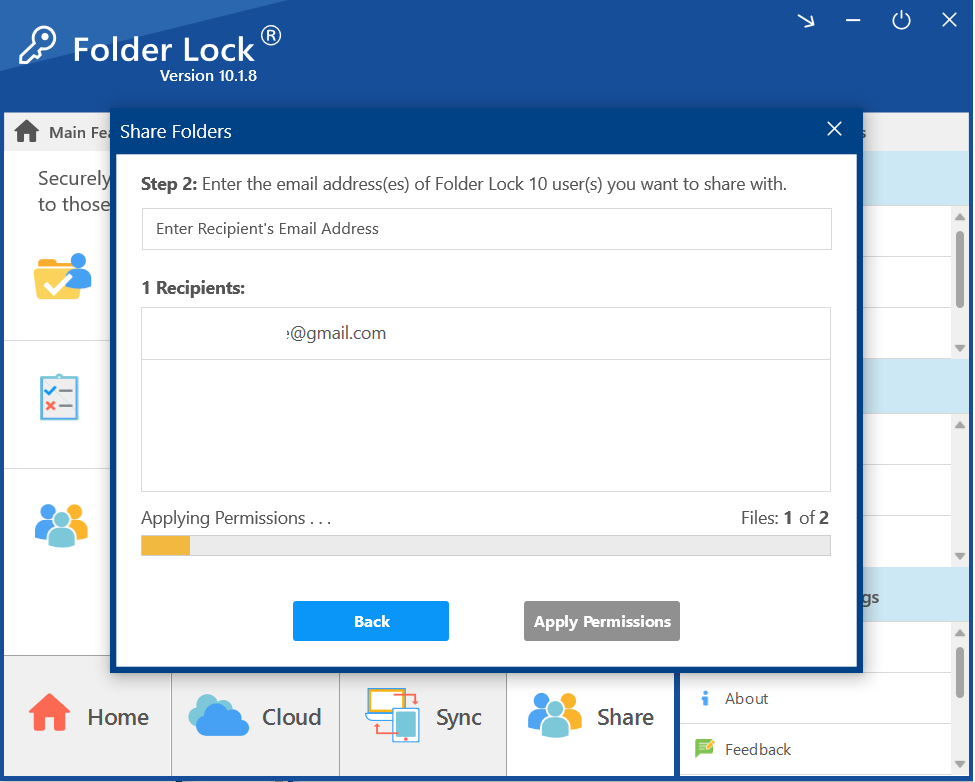
- Wait for Permissions to be Applied. A progress bar will appear, showing that Folder Lock is applying the permissions to your selected folder.
- Confirm Success. Once the process is complete, a pop-up window will appear with a green checkmark and a message stating, "Permissions applied!"
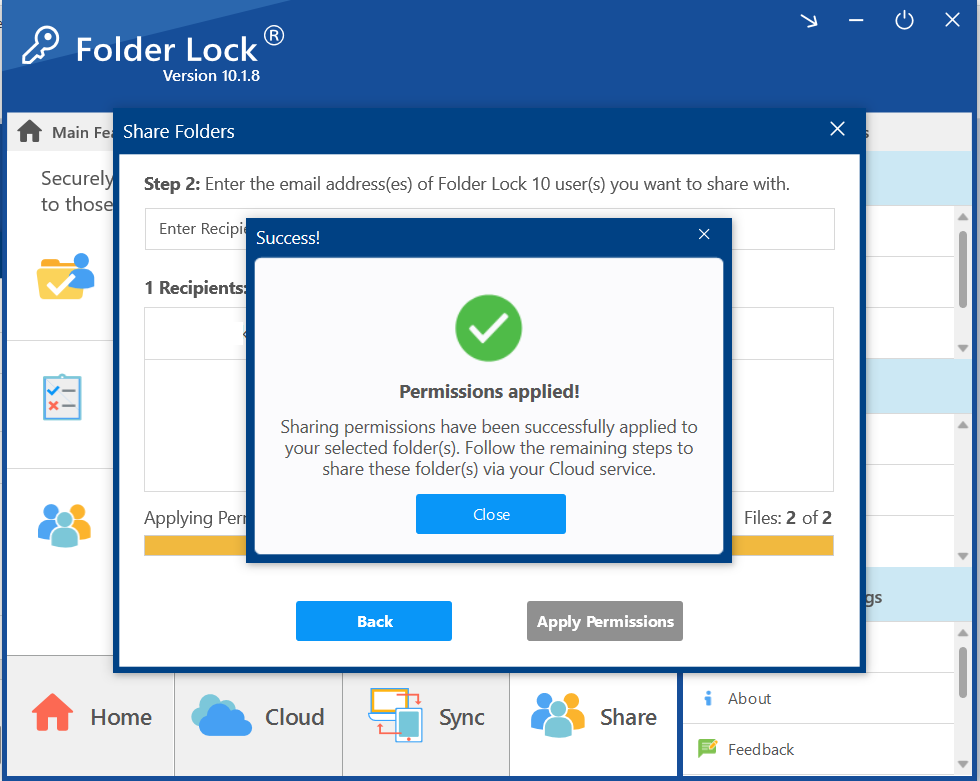
- Click "Close" to dismiss the message and continue with the sharing process via your cloud service.
Step 3: Sharing a File from Dropbox Locker (Windows Explorer)
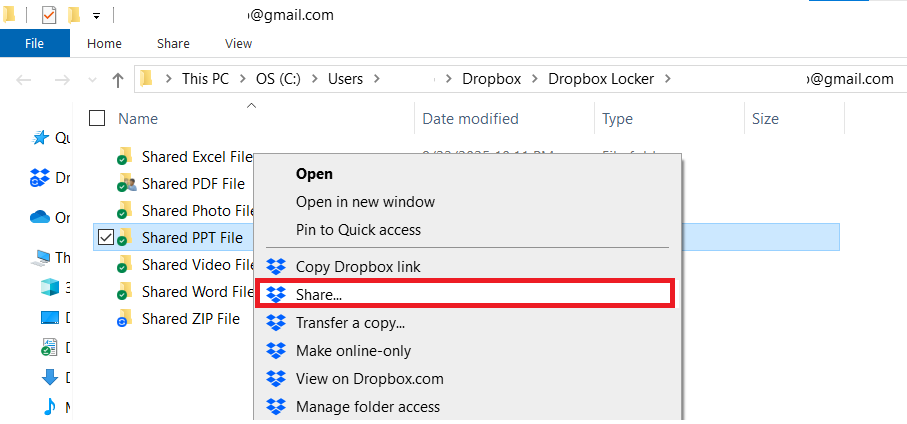
- Open the Dropbox Locker. Click on the link as show in screenshot.
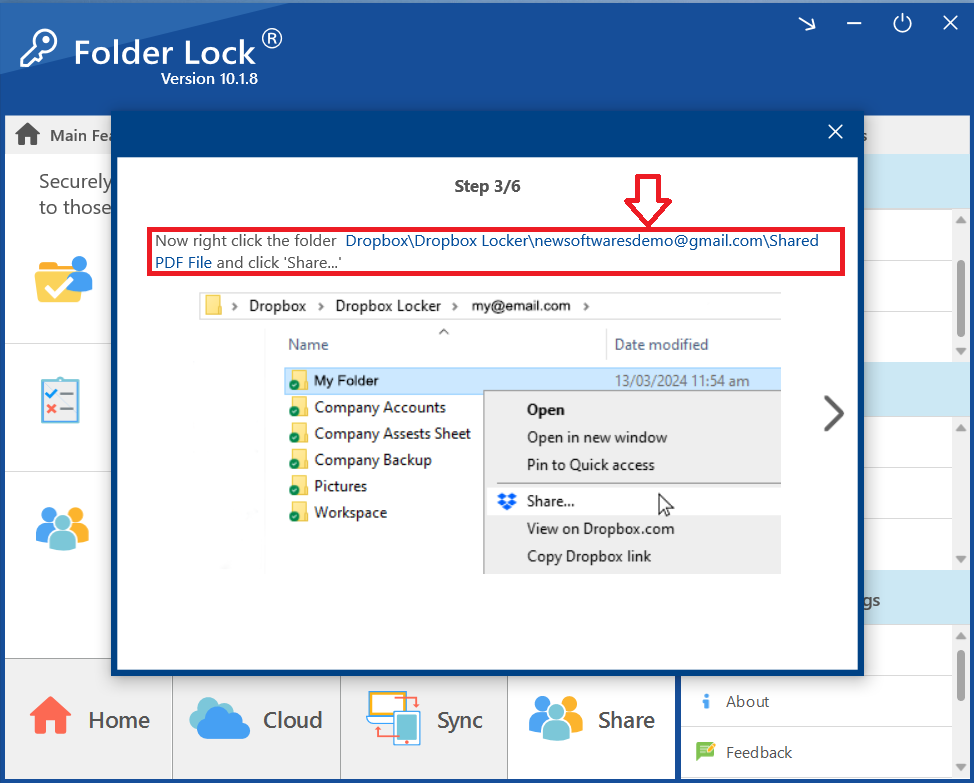
- Clicking on link will open your Dropbox Locker. Navigate to and select the folder containing your PPT file you want to share (e.g., "Shared PPT File").
- Share with Dropbox. Right-click on the selected folder or file. From the context menu that appears, select "Share" as shown in below screenshot
Step 4: Entering Recipient's Email Addresses
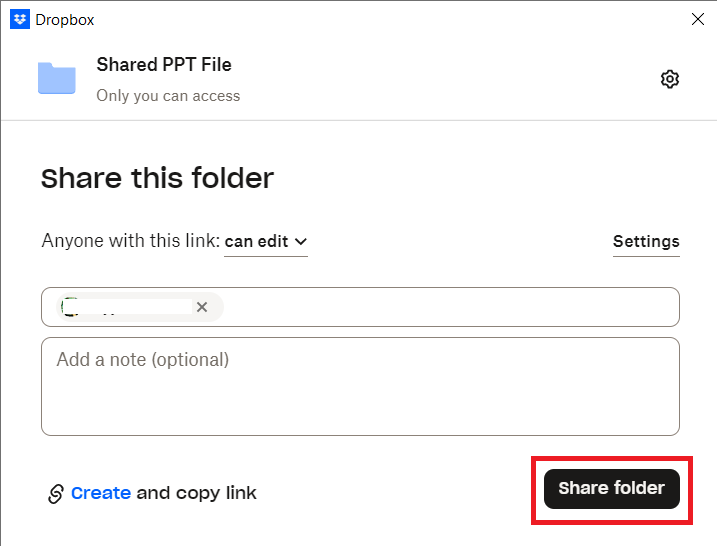
- Enter the Recipient's Email and Share. A Dropbox dialogbox "Share this folder" window will pop up. In the email address field, enter the email address of the recipient's Dropbox account and "Share Folder" button to send the shared folder to the recipient.
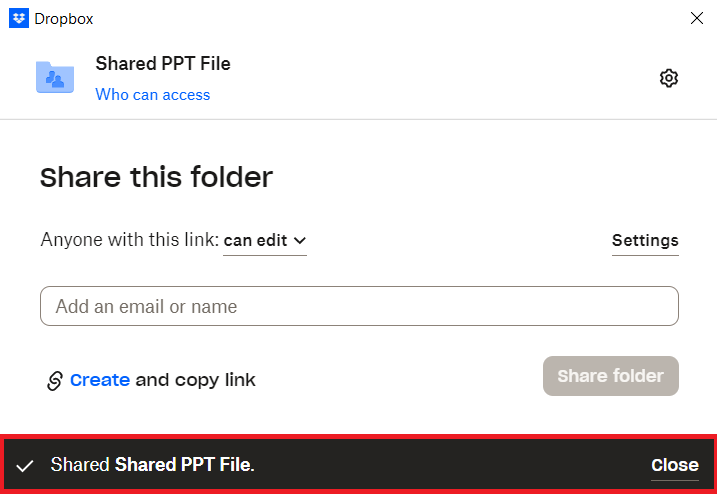
- Clicking the Share Folder button will share the protected PPT with your recipient and a dialog box appears which confirms that the "Shared PPT File" has been successfully shared. Click "Close" to close the dialog box
FAQs
Q: Does the recipient need Folder Lock to open the file?
A: Yes. The file is encrypted using Folder Lock's military-grade security. The recipient must have the application installed and logged into their account to decrypt and access the PPT file.
Q: What about the password? Do I need to send it separately?
A: No. Folder Lock's secure sharing system links the encryption to the recipient's account. This means they will use their own master password to access the file, eliminating the need to send a separate password.
Q: Can I use this method with other cloud services?
A: Yes. The same process applies to other integrated services like Google Drive and OneDrive, as long as both parties have the necessary accounts and Folder Lock is configured correctly.
Q: Why do I have to place the PPT in a folder to share it?
A: The Folder Lock application manages permissions and sharing at the folder level for organizational and security purposes. By placing the PPT file in a designated folder, you can apply specific sharing rules to all files within it, streamlining the secure sharing process.
Q: Can I share with multiple recipients at once?
A: Yes. During the process of applying permissions, you can enter multiple recipient email addresses. Folder Lock will then grant access to all of them simultaneously, making it easy to share with a team or group.
By following these professional steps, you have mastered a secure method for sending a password-protected PPT file. This process, powered by Newsoftwares.net’s Folder Lock, ensures your confidential data remains encrypted and protected throughout the entire sharing process. Using a dedicated offline tool and a trusted cloud service like Dropbox, you can confidently share sensitive PPT Files, knowing their integrity is fully maintained every step of the way.